 |
| Figure 1 |
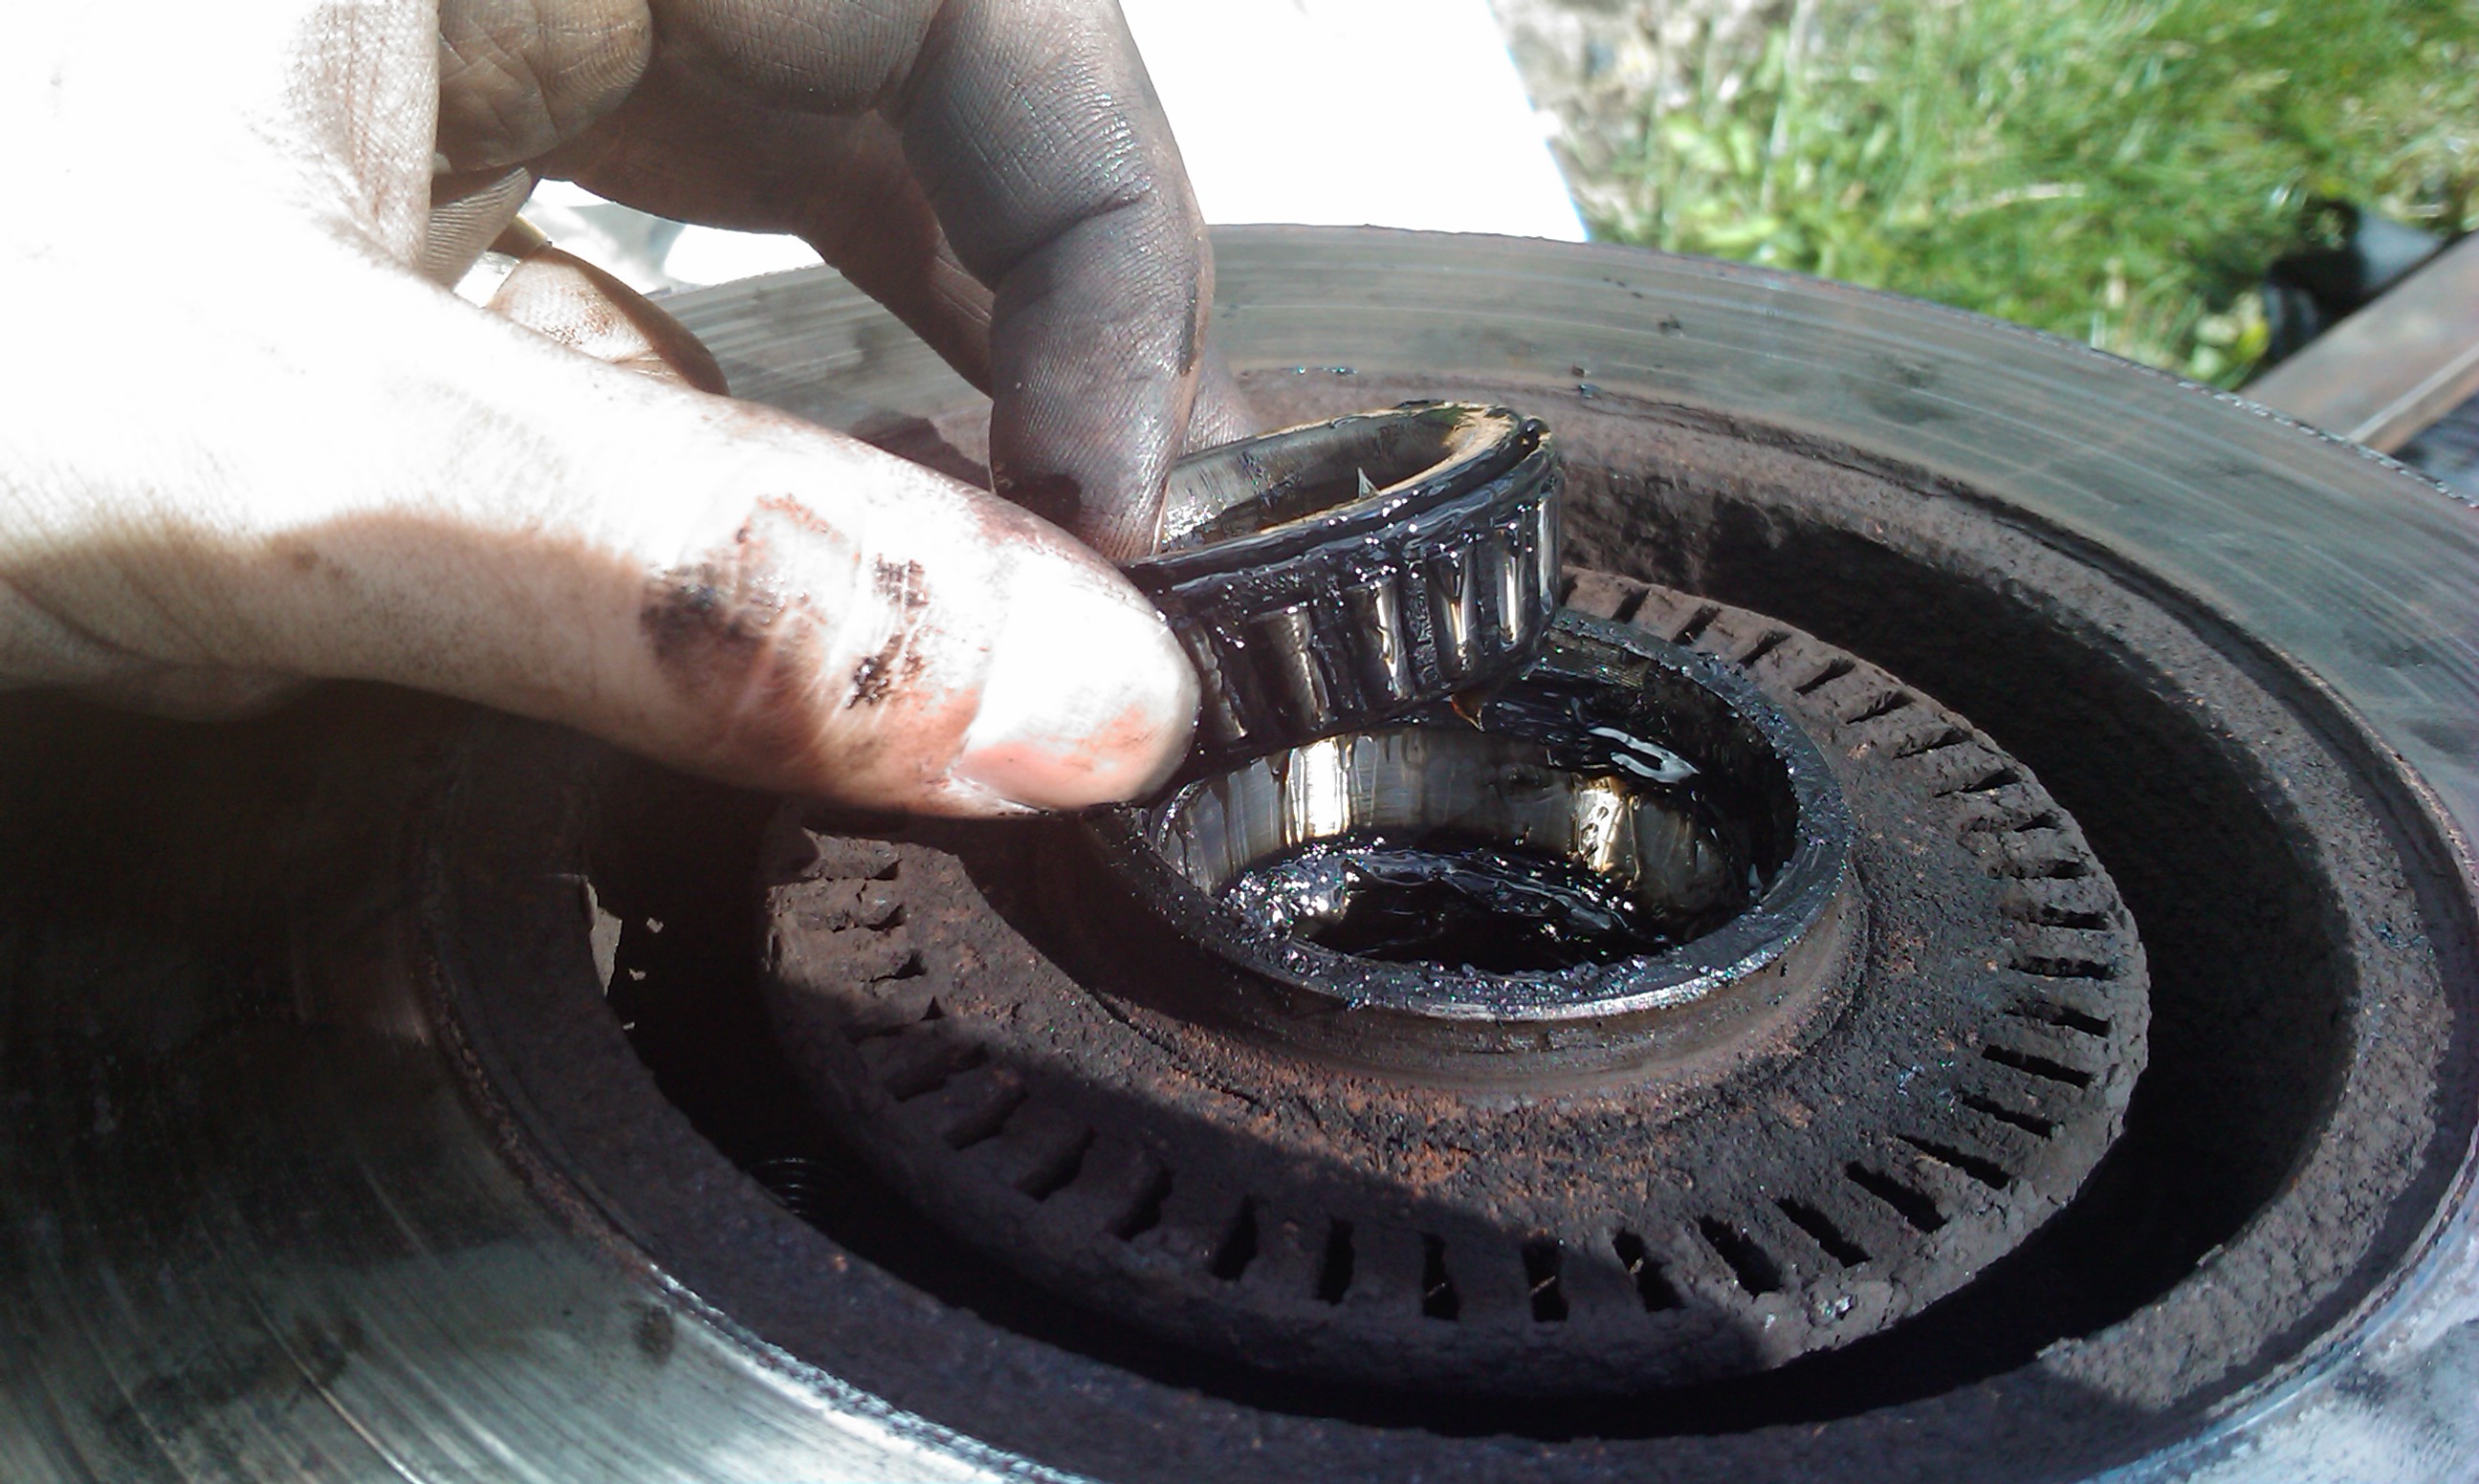
If you are planning on re-using the old bearings, note you will also need to press them out of the old hub.
Figure 1 shows just why it was time to change the discs!
Removing the Disc
 |
| Figure 2 |
Therefore I was thinking I would undo the nut with the wheel still on the ground. This turns out to be completely not the case. The hub rotates on the bearings about the fixed stub axle, which is fixed to the trailing arm, so it does not rotate with the wheel and therefore the wheel being on is irrelevant.
So, with the rear wheel removed, firstly you need to remove the brake caliper and caliper carrier. The caliper is held onto the carrier with two 13mm hex head bolts (figure 2). You will need to counter hold the caliper sliding bolts located in the caliper that these mounting bolts screw into. They need a bigger spanner, something like 15mm.
Now the caliper should just slide off the pads (outwards from the disc). May need to wiggle it a bit. Tie it up out the way to the spring as shown in figure 3.
 |
| Figure 3 |
Not to go off topic I will talk a little about removing and refurbishing the caliper sliding bolts at the end of this article.
Now the brakes are out the way, use a flat bladed screwdriver to lever the cap out the hub to expose the nut (figure 4) and using a pair of pliers manipulate the split pin out and remove the locking nut cover. If you can remove the pin carefully enough you can reuse it, but if you prefer they are very cheap items from any fastener suppliers.
 |
| Figure 4 |
 |
| Figure 5 |
So you can just go ahead and loosen then remove the nut and then remove the large washer located behind it.
 |
| Figure 6 |
 |
| Figure 7 |
Disassembling the Disc
 |
| Figure 8 |
I thought looking at these (figure 8) that I would break them getting them off, but in fact they came off very easily, just being a simple ring lightly pressed onto the disc. Just using a blunt screwdriver and tapping the ring off from the other side was easy. Clean them up with a wire brush and they are ready to simply tap onto the new disc. Figure 9 shows the ring as it was when removed.
 |
| Figure 9 |
 |
| Figure 10 |
 |
| Figure 11 |
 |
| Figure 12 |
So I used a blunt screwdriver and lump hammer to knock the races out bit by bit, ensuring I was moving it out evenly by alternating every few knocks in a different slot until it was free and out. Turn the disc over and repeat to knock the other race out.
The races required quite hard 'bashing' to get them out but they are, by their very nature, made of extremely hardened steel so withstand the beating.
Now you are left with all the components of the outer (figure 13) and inner (figure 14) bearing components.
 |
| Figure 13 |
 |
| Figure 14 |
Assembling New Disc
Take your shiny new disc and support it on some pieces of wood (to protect it) on a firm surface, ready to knock the bearing races in (figure 15). |
| Figure 15 |
After thoroughly cleaning both bearing race and bore, position the race in the bore and then find or make a suitably sized diameter with which to knock the race in with. Figure 16 shows that I had a nice chunky socket that was the perfect size for the inner bearing race. This is quite important as you want to be knocking (of more ideally, pressing) the race evenly all over.
 |
| Figure 16 |
Knock the race all the way into the bore and ensure it is seating completely flat on the bottom of the bore and not slightly slewed (figure 17).
 |
| Figure 17 |
Next, gently align and tap with a soft drift and hammer the ABS ring into place. It is a very slight interference and easily done. See figure 18.
 |
| Figure 18 |
Reassemble Disc Assembly on Car
Now everything can be put back on the car. Ensure you have cleaned all the bearing components thoroughly.Liberally pack the inner bearing cage and race/disc bore with new grease. Insert the cage and roll it around a bit by hand to ensure it is seating and rolling properly. Gently press/tap the oil seal back into the inner disc to a depth similar to its initial state. It shouldn't go so far in that it touched the bearing cage.
Now slide the disc back onto the (clean) stub axle. You will have to hold it whilst you get the outer bearing cage and insert that into place. Ensure you have greased that up too and also pack some grease into the bore of the outer disc area. Keep holding things together as it can fall; get the washer and nut on. Nip the nut up finger tight for now.
To adjust the nut, Haynes says to tighten the nut up to the point where you can just about slide the big washer behind it side to side with a screwdriver. This is not very tight at all; literally just nipping it up with a socket. See figure 19.
 |
| Figure 19 |
Put the locking nut cap back on and insert the split pin. Then maybe add a bit more grease and tap the hub cover back on.
Next re-attach the caliper carrier (now with freely sliding and greased pins). Figure 20 show the caliper re-attached with new pads in place ready for the caliper to be attached.
 |
| Figure 20 |
In theory, you open the bleed valve and 'wind' the caliper piston into the caliper; it effectively screws in. But for whatever reason, mine did not want to do this very easily. So it was a case of cunningly putting a G-clamp arrangement over the caliper/piston to apply pressure to it, without covering up the slots in the face of the piston to get a tool on to turn the piston with.
I had an angle-grinder tool (used for tightening the discs on with) which had pins just the right width apart to engage in the slots.
So you need to apply pressure, open the bleed valve and turn the piston... all very annoying and unnecessarily hard. But once you have wound the piston in sufficiently to allow the caliper to pass over the new pads/disc then you are done. Remember to do the bleed valve up.
Also note, the bleed nipples are quite delicate. I suggest at least wire-brushing the threads as much as you can and letting the area soak with penetrating oil to try and aid removal. Because they are delicate and possible very well stuck, it really doesn't take a lot of effort to just sheer them off. Then you are in another world of pain.
Now re-assemble the caliper onto its mount over the pads (figure 21).
 |
| Figure 21 |
Once complete, pump the brake pedal to make sure the calipers are full of fluid. They will feel spongy at first, but hopefully will firm up after a few pumps. If they do not firm up you may have got some air in the caliper when you were opening the bleed nipple. This means you will just need to go back to the calipers, attach a hose to the bleed nipples, open them up and bleed the air out, either with an Eazibleed kit or get someone to push the brake pedal while you open the valve. Close it before they release the pedal so it doesn't draw in more air.
Caliper Carrier Sliding Bolts
As a bit of an appendix, a few notes about seized caliper sliding bolts...So you need to get creative now to find ways to remove these. One of mine I managed to get out by just working it too and fro whilst trying to pull it out. This might work if it is just dry. But if it is stuck solid like the other of mine, then you need to get brutal!
So it may be worth trying to remove them whilst attached to the car just because it is a solid base to have the carrier mounted to whilst you try.
Although if you have a bench vice then you might as well remove the carrier and work on it off the car. Figure 22 shows the carrier removed with the two sliding bolts still assembled.
 |
| Figure 22 |
I ended up hooking the head of the bolt in a suitably sized open ended spanner, which was supported (by my foot) over the edge of a step, so I could hit the carrier itself away from the bolt. This worked.
 |
| Figure 23 |
Hi, I read your detailed explanation with photos before carrying out the job myself. All went according to plan until when I tested the brakes, the ABS appeares to be activated on every application of the brakes, (no dashboard light). I cleaned the sensor and the ring is fitted the right wat around. after a while, the abs stops working and the dashboard light illuminates. Any ideas what could be causing this to happen?
ReplyDeleteAndy
Submitted by Jon Reynolds on 25 November, 2010 - 16:29.
DeleteHi Andy,
Glad someone has found my guide a bit useful. Really sorry to hear about your ABS playing up though. That's the last thing you need.
To be honest its going to require just a bit of trial and error to track down the problem. I would start by checking both the ABS rings are not damaged and sitting correctly on each disc.
Hopefully you didn't touch or knock the ABS sensors themselves, but if you think you might have check whether they can move or anything and make sure they are seated in their proper positions.
Next I would try one of two things. Find someone with a VAG-COM kit or similar who can plug into the car's ECU and see if there are any reported faults present, which would maybe track down a faulty sensor.
Or try and borrow or by some second hand (working) sensors to swap the old ones out to try and eliminate the sensors that way.
Failing that a trip to a garage may be required. Hopefully its an easy fix. Its always the way with cars though, fix one thing then another breaks and you end up opening a can of worms.
Good luck and let me know your outcome.
Jon
Hi Jon, I have been searching on the web for ages trying to rectify the problem i have, i had to change 1 side rear wheel bearing and all went fine with that but i have now developed another fault, well 2 :(
DeleteThe 1st thing i noticed after replacing the wheel bearing was that everytime i applied the foot brakes and release there seems to be a noise coming from one of the front wheels, feels like a grating noise but only when i release the pedal and now i noticed that 1 of the rear brakes are binding, the wheel did feel abit warm when touched, also when driving off i can feel the car holding back, any help would be appreciated, many thanks.
Hi Suren,
DeleteThe grating sound from the front sounds weird, were you doing any work up front? I wonder if the grating noise is the ABS kicking in maybe? But weird why it would do it when you release the pedal... usually grating sounds like a worn out pad.
When you replaced your rear wheel bearing, did you replace the brakes too? I can only think that the binding must be caused by a sticky or incorrectly fitted caliper. If they haven't been serviced for a while, the slider pins could be very dirty or corroded and not wanting to slide freely. Did you take the caliper slider pins out and clean them up and re-grease them to ensure they are free to slide?
Hi Andy, i have removed the passenger rear caliper and noticed the piston was seized, the boot rubber split and and that caused the piston to stick and rear brakes bind, i tried to push it back in but finally realised that i may just have to replace the whole caliper as there is no repair kit for this problem.
DeleteI still have not got arround to rectifying the grating when the brakes are applied but as you say it might just be that one of the sensors had been knocked or not seating properly, well i need my car asap so when hopefully sorted out i will reply on here if it helps any1 else, thanks for your help, Cheers
Suren
Hi Andy,
DeleteDid you ever got to the bottom of your problem?
I have just done my fronts and all went fine, then did the rears and i've encountered the same problem as you, ABS seems to kick in straight away, then after a period of time, (never the same ammount of time) the red ((!)) comes on and so does the ABS light. the brakes work fine once this is on however the ABS obviously doesn't work.
I've taken out the ABS fuse for now to give me brakes that work, without ABS, but really want to get this problem sorted... I'm thinking i've damaged the inner reluctor ring on one side maybe but am very interested to hear what your cause was.
Much appreciated
Gav
Hi,
DeleteI have just done the rear rotor replacement and have exactly the same issue. Did you ever resolve it? I'm about to start fiddling with abs sensors, vagcom etc.
thanks
Jon
I waited for warmer weather (working on a ar outdoors in winter is not pleasant).
DeleteBought a VAG-Com lead from Amazon (cost £10), downloaded the free function restricted software, plugged into port in rear ashtray, reset codes, drove off and ABS light came back on. Told me it was right rear sensor. Removed and cleaned sensor (it was filthy but had been there 200,000 miles) and code was replaced by rear left. Repeated the process on the rear left sensor. Now I have ABS and ASR back working, and the red exclamation warning symbol has gone. As my brakes had felt bad at times I was pretty pleased with this free outcome!
my car developed a fault with the ABS. i just bought a vagcom from ebay for about £4. took about three weeks to arrive but when i clagged it into the car, it diagnosed my ABS as no signal from the right rear sensor.
ReplyDeletereplaced the sensor, and it was ok until i started driving.. at which time the fault came back as an error on that side again. so im about to go out and look at the reluctor.. thanks for the photos and guide, they were really helpful.
vagcom is a must if your trying to locate a problem with the ABS as it will tell you which corner it is and which sensor/ring.
thanks very much for for loading this page with so much detail and great pictures i did exactly what you said unfortunatly for me :( icould not remove the last two bolts which hold the caliper mounting bracket and so could not remove the disc which hasn't been changed for a long time,the pads were so bad they crumbled when i removed them,it was my first time ever doing diy on a car apart from oil change which i did yesterday.i tried using a plumber type blow torch but couldn't get enough heat to soften the bolts for removal,so i'l be going to garage as they'll have the equipment/tools to do it.i hope the auto suppliers will accept the rotors/bearings/abs sensors,,i did open them all but only used the pads whch are still on the car with old worn discs i was so dissapointed i couldn't finish it tho it was realy good till i couldn't remove them last two bolts,but i suppose thats the way it goes for lots of us diy'ers keep up the good work and thanks very much for all the information you give hope to green-horns like me,you are only one with detailed description on what to do with helpfull tips on faults too.
ReplyDeleteReally good info here about replacing the discs, bearings and pads.
ReplyDeleteSeems its always the lower sliding bolt that seizes over time. To save a lot of hassle i just find a part from a breaker thats working, such as i did for the pad carriers. Those seizing bolts just make the rear brakes not work very well and thus they all end up looking rusted as shown but the mot brake test will pass as will handbrake, even in that condition. The bloody pad carrier on the hub seize, the 2 mounting torx bolts, so they are a bugger to get off for the home diy`er. I always find tightening first, yes tighting, if a bolt is seized, the amount of times ive seen that cracks the bolt, then able to loosen.
You know a lot of mechanic`ing isnt rocket science but the ramps, tool, workshop route has advantages when jobs get tough. Hey ho just take 3 times as long eh?
I suggest buying the piston retract tool from unipart, cost me £19 and will be used for most rear disc/ handbrakes vehicles. (Although some motors have a separate shoed hub for handbrake - mitsibishi`s etc). Youre gonna have a hard long job of it using G clamps and other props! Its needs a constant pressure/turning and its easy with the tool.
Note worthy comment about the bearings....always check the tightness setting of the thrust washer / lock nut. Ive seen people killed...overtightening the bearing thrust washer will cause it to fail/seize and if on the motorway at 70mph...you will die if the seizes!
I suggest for the inexperienced get a garage to push in the bearings, you cant really do it with a socket and (persuader) hammer. You need a vice and appropriate sized socket to match tbh.
Note to Americans: they are called brake discs not rotors. A wheel rotates but you dont call that a rotor. Clearly they are discs. Stop renaming everything, doesnt make you unique, just annoying.
Hi started to change rear brake discs today after reading your guide but ive come across a problem.I have got the smaller of the two bearing races out but the bigger one i cant remove and my hubs dont have the slots in to get behind the race do you have any ideas how I can remove it.Also does the abs sensor protrude out if so by how much and do they wear down or dont they come into contact with ring.
ReplyDeleteDave
Have you tried using the tip of a masonry chisel and tapping on left then right of the bearing race shoulder to drive it out? Or is there just no shoulder exposed to do anything with?
DeleteThis really demonstrates that you can still find individuals that value the things they submit online. I really enjoyed reading through the comments.
ReplyDelete