Friday 6 July 2012

Guide: Volvo V70 D5 Auxiliary Belt, Idler and Tensioner Replacement

Removal

Remove the plastic engine cover by just pulling it up and off. To remove the belt, the tension must be released first. The tensioner is an automatic spring-loaded type, which can be released with a ratchet and suitable fitting. On newer replacement tensioners, there is a Torx hole on the swinging body of the tensioner, which you can put a T-60 Torx plug into on the end of a ratchet to lever the tensioner away from the belt:
Torx T-60
There is a locking hole in the tensioner body to allow a pin (or similar) to be inserted in the released position to keep the tension off the belt, which is very handy during replacement. the below image shows the (old) tensioner locked in position. You can also see in this picture the T-60 hole to the left of the locking hole on the front face that you would use to lever the tensioner.

Thursday 23 June 2011

Fitting USB-SD Adaptor to Volvo V70 HU803 Stereo

The box emulates a CD changer to allow music on a USB drive or SD card to be accessed from the car stereo as if it were CDs in the changer.

Removing the Head Unit

First remove the pen clip by gently prising it out. It is not screwed in, just clipped, so gently(!) levering it out with something thin should get it out no problem. Just be bloody careful not to damage the surrounding plastic trim(not sure if this is here on all cars, if not something else should be in its place that can equally be prised out).
In the gap behind where the pen clip was, you can now access two screws that secure the climate control unit:

Wednesday 23 March 2011

Guide: Replacing Headlight Units on BMW E34

After discovering a crack in my dipped headlight bulb, the light soon dimmmed and then the bulb blew. It was clearly letting in water, but also, obviously this would not pass MOT like this.

So I sourced 2 new(ish) headlight complete units from eBay and this is how I changed them.


Cracked Headlight

Saturday 15 January 2011

Guide To Replacing Rear Subframe Bushes On BMW E34

This guide documents how I replaced a rear subframe bush on an BMW E34 525 TDS Touring.

I am by no means an expert, I just enjoy working on my own cars. Following this guide is done entirely at the reader's own risk.

Symptoms for the failure of this bush are described here.

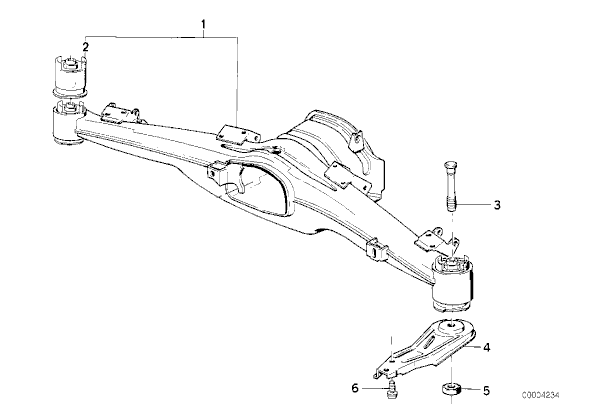
Here is a diagram (courtesy of RealOEM)of the rear subframe to help visualise what you are replacing.

Item number 2 is the bush, rather misleading shown above the subframe as it actually assembles into the bottom of the subframe housing. It is about the size of a Coke can. Its anatomy, very simply, is an outer steel cylinder and an inner steel pillar, which is bonded to the outer by means of solid rubber. This rubber connection is what isolates the vibrations of the road/subframe assembly from the vehicle. The outer cylinder is also coated in the same rubber.

Friday 14 January 2011

BMW E34 Rear Subframe Bush Removal Tool

I am planning on replacing the bushes that connect the rear subframe to the chassis. As I explained previously, these appear to be very worn out and getting worse.

The bushes pressed into the housing in the subframe. It is not a metal to metal fit as the bush has an external rubber coating over a steel cylindrical body. So even though it is a tight fit and requires a tool to remove and install them, hopefully removal shouldn't be too difficult as one can always heat to soften or even melt away the external rubber coating (with great care of course).

Monday 4 January 2010

Guide: Changing Front Lower Control Arms on BMW E34

One of my to do items for the BMW was to change the control arms, as the wear in the bushes/ball joints was becoming very apparent.

The symptoms are basically wobbling / vibrating of the front end of the car, not just through the steering wheel but you could feel the whole car shaking from side to side. It started at just certain speeds on the motorway, about 50 - 60 mph, which then progressed into bad vibration under braking.


Sunday 2 August 2009

Replacing Audi A4 (B5) Rear Discs and Pads

At time of writing, I am preparing to sell my 1998 Audi A4 (B5) 1.9 TDI. This article is simply to document, for the benefit of others, the process of replacing the rear brake discs.

Figure 1
Whenever renewing brake discs, one should always replace the brake pads; removing the discs requires removing the caliper and pads anyway so this is no extra work. Also it must be noted that the rear discs form the rear hub that the wheel mounts to and therefore houses the rear wheel bearing. There are two bearings per hub, one out and one inner, both of which have their outer races pressed into the hub (disc). Therefore to complete this job you need to be able to press the bearing races into the new hubs (whether these are new or the old ones).