So I sourced 2 new(ish) headlight complete units from eBay and this is how I changed them.

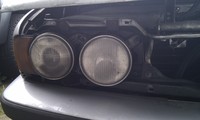
1. Firstly remove the cowling that covers the rear of the headlight unit, within the engine bay. The image below shows how the right hand side looks to begin with. The air filter housing is the large black box behind the headlight and this can be easily removed (and needs to be really) to improve access. Also shown in the picture below are the two tabs that hold the cowling to the slam panel.


Disconnect all wiring to the headlight unit: main beam, dipped beam, side light, indicator, level adjustment motor (some of these connections may become more accessible as disassembly progresses).

2. The grill needs to be removed in order to remove the headlight unit. I have read accounts by people saying they managed not to completely remove the grill to do this, but it is very simple to do and just clears more clutter out the way.
The grill is held in place with only clips. There are clips right at the extremities, where it passes under the headlights, then a couple in the middle, just below the kidney grills.
Releasing the outer clips is a little fiddly, but only because you can't see the clip. You have to just have a bit of patience and feel your way with a long thin rod (i.e. a long screwdriver) as pictured right. The picture shows the clip already released and grill moving out slightly, so you can see what the clip looks like and where it is. You just need to find it with the end of the screwdriver by gently probing down the hole and finding the 'springy step' and then gently push down and prise the grill out by its end. Repeat for the other side.
BE GENTLE, it is all only plastic. It will come away easy once you have found the clip.
Once each end is free, move to the centre, looks through the grill openings and there are two more clips behind each, which need pushing down to release them. Again, it will happen easily once you have found the clip, so no forcing should be required..its all only plastic!

3.

Next to remove the plastic trim surrounding the headlight unit, there are 5 or 6 screws, all accessed from the front. Unscrew these and the plastic trim comes away.
Note that one of these is tucked away right in the outer corner underneath the indicator lamp, going into the very front corner of the wing.

4.

There are some large fixing now exposed which are actually holding the light unit to the car. There are about 4 accessible from the front, then two inside.
The ones from the front are only the very outer ones. You can tell by looking which ones hold the whole unit to the car while others just hold individual lights onto the light unit.

The two internal ones are shown here. The first is in the middle of the image.
The second is a view towards the inside of the wing.

Once all the fixings are removed, manoeuvre the headlight unit out of the car.
5.
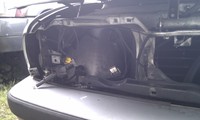
Once the unit is out, you will be left with a gaping hole in the car as shown.
The shot below shows the headlight unit I removed (with the cracked lens) and the water on the ground surrounding it is what fell out of the dipped beam unit! Just goes to show how much water had managed to ingress through the crack.


The indicator unit is separable from the main headlight unit and needs to be swapped from the old unit to the new. Looking at the back of the unit, you will need to remove the 2 fixings to remove the indicator. Once the indicator is off, it can be simply re-attached to the new headlight unit.
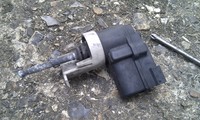
The replacement headlight units I had acquired seemed to have broken levelling motors, so I decided to try and swap these over. This was tricky to say the least as it was all mounted with snap type plastic fixings which were all pretty delicate and difficult to get out without breaking.
I managed to get a good set out of all the lights. Here is one of the motors removed.
6.

Refitting the new unit is very simply the reversal of removal. Just refit the unit into the car, refit the light grill, the main grill etc.
The only other thing worth noting is that I removed (or loosened) the windscreen washer reservoir to provide access to the headlight internal fixings.

No comments:
Post a Comment